|

FIRE MAKING

Out of all the survival skills you need to master, I am a firm believer that “fire making” is the most important survival skill. Why? A fire will give you warmth when it's chilly, cold and downright freezing outside.
A fire will provide you light during darkness so you can see to do some other things.
A fire will allow you to cook your meals and boil water so you can consume them safely.
A fire will dry out your clothes when they get wet so you won't catch a cold and get sick.
A fire will provide you a way to signal for help, both during the day and especially at night.
A fire will help keep all types of critters away, the four-legged, the flying and the "boggy man" too.
So the bottom line is this, by not knowing how to make a fire it could mean the difference between life & death, especially in a cold weather winter wonderland environment. And so allow me to briefly cover what some other survival sites say about fire making...
TO CREATE FIRE... you need three elements - heat, fuel and oxygen, and in certain quantities and ratios too. Because if you use too much of one and not enough of the others, you'll produce either no fire, too much fire or a smoking fire.
WHEN SELECTING A FIRE SITE... choose a location where there's plenty of wood nearby so you won't have to walk far to gather it. And if it's windy and or raining, you’ll have to select a place that will provide your fire site some protection. And if you can’t find a place, then you’ll have to erect a wind breaker or deflector made out of rocks and or logs.
LOOK ABOVE & BEYOND YOUR FIRE SITE... to make sure there are no tall dead trees around that could catch on fire or fall down on top of you should a storm come along. And the exact spot where you intend to build your fire, clear the ground of any flammable material like dry grass, leaves, pin needles, etc. And either dig a shallow hole or make a circular wall out of rocks to keep the fire under control. If the ground is covered with snow, clear away some of it or make a platform made out of green or wet logs so your fire won't melt the snow below it, sink and disappear.
PATIENCE & PRACTICE... is the key to successfully learning how to make fires. And if you practice making’em in all types of weather and terrain conditions when your life DOESN'T depend on it, then you will learn how to overcome these fire making challenges shoud you someday find yourself in a real life or death survival situation. And the sooner you do the sooner you will be on your way in becoming a "Fire Master.” Maybe not right away in one day or night, but eventually over time. So the more you practice making fires, the more experience you will become and the easier it gets. Got it?
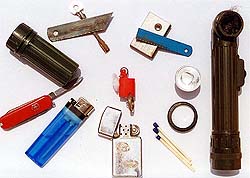
Now let's talk about fire starters, have you ever used any of these before? I'll bet ya have, probably the matches and cigarette lighter, right? Well some of these other fire starters are easy to use and some aren't, and some of them just don't make any sense at all to pack and carry in a survival kit.
Why? Well the purpose of all the items that come in a survival kit whether it's a store purchased kit or one you put together yourself is to save your @ss in a survival situation. And if you pack and carry a fire starter that you have neve used before or it's one of those that doesn't work very well in bad weather, what good is it? And so what I'm going to cover here are the pros and cons of some of these fire starters.
|
|
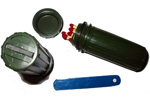
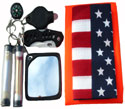
QUESTION: Of all these fire starters you see in the photo, which one do you think is an "all weather fire starter?" (Answer will be below.)
 |
Flashlight Fire Starter - According to some survival gurus, you can start a fire by (a) removing the round mirror reflector and inserting where the light bulb goes a "cigarette." Then by holding the reflector in the direction of the sun like a magnifying glass you'll be able to ignite the end of the cigarette which then you can use to get a fire going. Another way is (b) by removing the round mirror reflector & light bulb and if you take some "fluffed up" #0000 steel wool and place it on the two metal positive (+) and negative (-) prongs inside the flashlight, it'll ignite and catch on fire. And another way is by (c) carefully breaking the "glass" light bulb WITHOUT breaking & damaging the tiny small pieces of wire [inside the bulb] and then place something extremely flameable like cotton next to the wire,s it’ll ignite and burst into a flame. |
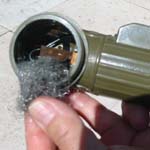 |
The Problem? No sun - no sunrays - no heat = no fire! Though this method works really well in tropical and desert environments where the sun's rays are much more plentiful and powerful, it doesn't work so well in most other places of the world. But it also depends on the type of material you're trying to ignite and burn too. Yea, a cigarette works great, but if you don't smoke, where are ya suppose to get a cigarette? And the steel wool? Where are you suppose to get this? Pull it outta your ass? And if your flashlight batteries are weak or they’re dead? Then what are ya suppose to do? Duh?
Magnifying Glass - Once again, this works well in tropical and desert environments and in most other places of the world. But the better quality made magnifying glass like from a pair of binoculars or camera lense, the smaller and sharper you'll be able to focus the beam of sunlight onto something to get it to ignite and burn.
The Problem? Again, no sun - no sunrays - no heat = no fire! And to ignite something with a magnifying glass the material has to be very dry, very thin and very sensitive to heat or it won't ignite and burn. Duh?
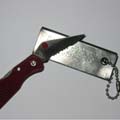 |
Magnesium Fire Bar – Ok, so I once stated “…the most overrated, overpriced and hyped up commercial product on the market…” And the reason why I said this was because everytime I tried to scratch off some magnesium shavings from the mag side of the bar it went everywhere except where I wanted them. And I heard it wasn't just me who had this problem others too. And yes I also said "..the only good thing about a magnesium fire bar was the flint rod that when scraped it will produce thousands of sparks.” Well, see my up-to-date comments below. MAGNESIUM FIRE BAR TIP: Want two Mag bars for the price of one? Grab yourself a hacksaw, cut it in half and presto, you'll have two. Worked for me. WARNING: Cut outdoors - NOT indoors or FIRE!
|
 |
The Problem? If you can scrape and keep all the tiny pieces of magnesium shavings together in a nice small little pile on or near what you're trying to ignite. With just a few well placed sparks you should be able to ignit it. But... it’s hard as hell to try to keep all those tiny magnesium shavings together.
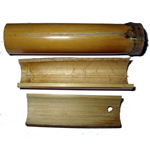
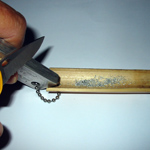
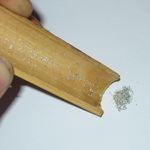
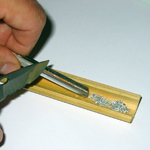
The Solution? I came up with this idea after trying it out with my Magnesium & Steel Fire Rod and it works great. What you need is a half a bamboo stick the same length as your magnesium fire starter or fire rod and drill a hole on one end so you can attach it to your fire starter. To use, just lay down this half of bamboo stick, place your mag bar or rod on top of it and scrape off some shaving. What this bamboo stick does is catch all the mag shavings so you can place'em where you want in a nice tight pile and ignite'em easier too. Works for me, check it out!
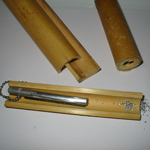
Here's how you make a Mag Bar "magnesium catcher" out of a piece of bamboo and how to use so you can emplace'em where you want'em.
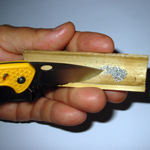
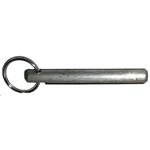
And here's how I made a smaller version for my "Magnesium Fire Rod," the same type that comes with all my SOS Survival Kits.
 |
Zippo Lighters - A long time ago I read an article about Zippo Lighters in an old magazine called “The American Survival Guide.” It was written by some survival guru “idiot” who claimed a Zippo lighter makes a great survival [kit] fire starter. Yep, they're pretty durable all right, easy to use and will start a fire in seconds too. |
The Problem? Anyone who has ever owned a Zippo lighter will tell you the lighter fluid doesn't last very long. And so you either gotta refill it often or carry a can of lighter fluid around with you. Duh? To the writer who wrote that "Zippo article…" don't take this personal, but I think you're freakin idiot if you think they make great survival kit fire starters!"
UPDATE: Nope, I didn't change my mind, I still think the writer of that Zippo article is [still] a freakin idiot. Including another one who recently wrote and complained to me about what I said about the Zippo and this other idiot. And so now there’s two Zippo idiots in my book, to see what he wrote, go to my “Zippo& Spark-lite” page.
|
Butane Lighters - One of the most commonly used fire starters carried in a survival kit because they're small, compact, inexpensive and will last a long time too. Though they come in assorted colors, it’s best to pack & carry either an orange or red BIC lighter just in case you accidentally drop it, it'll be easier to find on the ground. The least preferred colors are white and green because should you drop'em in the snow or some tall grass… they’ll be hard to find. |
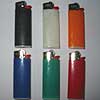 |
The Problem? In extreme cold weather the gas/liquid inside butane lighters will freeze up. So to make sure they don't freeze up and they'll keep on working it’s best to keep them next to your warm body such as in your pocket and NOT inside your pack or rucksack.
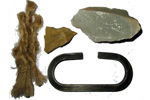 |
Flint & Steel - What our early ancestors used to get a fire going. No doubt an excellent fire starter back in the old, old, old days and works by carefully striking the flint with a piece of steel thus sending small tiny chips of hot steel onto some dry tinder and then blowing on it to create a flame. |
The Problem? Takes lots and lots of practice, patience and skill, not very easy to master and works terrible in bad weather.
Waterproof Match Containers - If you buy the one with the "flint" on the bottom, when your matches run out you can use it as a back up fire starter. But before placing any matches inside the container, cover them with candle wax to further waterproof'em and to make'em burn longer too. |
|
The Problem? Holds about 36 x wooden matches, but if you stuff it full of cotton balls and matches too, when you run out of matches you can use the flint [on the bottom] to ignite the cotton, or vice versa. Or better yet, break the wooden matches in half so you can store inside 72 short matches instead of just 36 long ones but they gotta be "strike-anywhere-matches."
The Four-Finger-Fire-Starter - The smallest, compact, self-contained, fire starter on the market, developed by yours truly… US Army Ranger Rick!
The Problem? Nothing, works great! That is until I decided to stop making them. The reason? I don't have time anymore, I'm too damn busy doing other things. But if you go to my “Zippo & Spark-lite” page you'll be shown how to make’em yourself out of a BIC lighter.
|
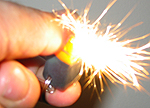 |
ANSWER to my question as to which of these fire starters is an all weather fire starter? The magnesium & flint fire bar and my magnesium & flint fire rod that come with all my SOS Survival Kits. Should your tinder become damp or wet, all you have to do is just scrape a few magnesium shavings from the mag side, place the flint side down near the shaving and then run your knife vigorously across the flint to produce a shower of sparks and presto – you’ve got FIRE!
Now let's move on and talk about how to start and create fire...
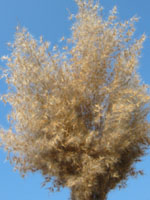
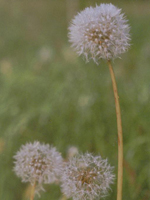
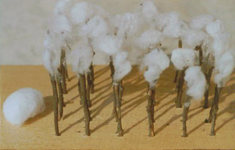
TINDER - This is the primary fire starting material needed to get a fire going and it needs to be made out of some very fine, thin, dry, hairy material that is very sensitive to heat so all it takes is a single spark to ignite it. Such as some very fine, thin, dry grass, pine needles, shredded bark, and any plants that contain something similar to "cotton" like these plants below that will ignite and burst into a flame very easily.
And as Army Ranger George W. Jasper describes in his book called Six Ways In & Twelve Ways Out "…in order to get a fire going you need to make a tinder ball, which is nothing more then twisting, ripping and fluffing up your tinder with your hands until it's about the size of a tennis ball and will only take a spark or two to ignite and burst into a flame." |
 |
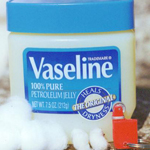
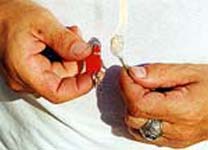
What I like to do is make my own “mini tinder balls” out of cotton balls and Vaseline/Petroleum Jelly and then carry them inside a small plastic 35mm film container. They're extremely flamable and easy to make, all you gotta do is stretch, fluff & spread out a cotton ball, add a little bit of Vaseline/PG to it and then roll it back up and squeeze out the excess.
When you're ready to use'em, all you gotta do is "stretch, spread & fluff'em up" and then all it takes is a spark to ignite'em and they'll burn for about 3 minutes. Note: If you can't get them to ignite, the reason is (a) you didn't stretch, spread & fluff'em up it enough and or (b) you didn't squeeze out all the excess Vaseline/PG.
| If you're lazy and rich you can buy pre-made tinder or fuel tabs from almost any military, camping & outdoor supply store. Or if you wanna save some $$$ just buy yourself a package of “Magic Candles” that you can’t blow out once they’re lite. Once they're lite they work great in getting a fire going and you don’t have to worry about the wind blowing'em out either, very inexpensive too. |
 |
|
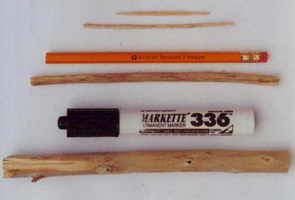
KINDLING - Are thin, narrow, short pieces of wood that must be placed on or above the tinder according to it’s thickness & size so they'll ignite and burn more easily and rapidly. Which you must first start with toothpick size, then pencil size, then magic marker size, then broom handle size and so on.
FUEL- Once the kindling starts to burn, then you're ready to start tossing in wrist, arm, and leg size fire wood. But be careful not to place too much wood on the fire or you could choke off the oxygen and it'll start to smothering and smoking. And if it does do this, then you’ll need to remove some of the wood and then gently blow on the hot coals to get it to stop smoking and start burning again. Then gradually place some more wood on it until you have the size of fire you want. Remember: The smaller the fire - the less wood it takes to keep it going. The bigger the fire - the more wood and more work you'll have to do to keep it going. |
 |
I once read in someone's book “...the difference between a cowboy fire and an [American] indian fire is that cowboys like to build big ol' camp fires and spend all their time gathering wood trying to keep it going. While indians like to gather all their wood first and then a build small camp fire so their fire wood will last them throughout the whole day or night.” Makes sense, don’t you think? Sure does! Now we're ready to discuss the different types of "fire layouts," here's what some of them look like and how to make'em.
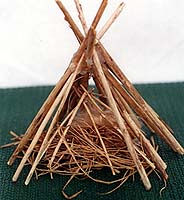
THE TEEPEE FIRE - First place your tinder ball on the ground and then carefully construct a cone shape teepee around it starting with toothpicks and then pencil size sticks. But make sure you leave a doorway open so you can get in and ignite the tinder in the center. |
 |
 |
Once the teepee fire is going, you can either continue to keep it burning like a teepee by adding more wood to it in a cone shape pattern, or you can change it into another layout such as these fires below... |
THE STAR - This layout works great when you've got some long, thick, wood to burn but no way to cut them. And so what you do is place them in a star shape pattern and burn'em starting at the ends. And as they burn up, you push them further into the fire to keep it going. |
 |
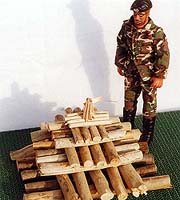 |
THE PYRAMID - A long, lasting fire requiring very little attention once it's constructed and starts to burn. Must be built in layers with the bottom being the thickest & longest to the top being the thinnest & shortest. Must be ignited at the very top so the fire will burn downward in stages. |
Got A Question About Fire Making? No problem, my fire master buddy "Bow" Beauchamp will be happy to help ya out. Contact him at: allansue@cyberbeach.net
 
Wilderness Survival Skills > Wilderness Survival Tips > Here
Back to top of page
E-MAIL THIS SITE TO A FRIEND |