|

EXPEDIENT SHELTERS
What's a shelter? A shelter is something that protects you from the weather, temperature, and surrounding terrain. Such as by using it to keep warm, dry, cool, reduce thirst, retain body heat, and get a good night sleep too. And for starters, there are two types of trees that can be used as natural shelters and I like to call'em "rain drop deflectors" and "snow flake catchers." And here's what they look like…
|
|
 |
|
|
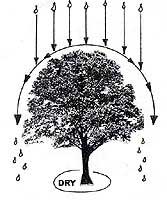
Rain Drop Deflector |
|
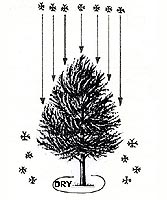
Snow Flake Catcher |
A "rain drop deflector" is a tree with lots of leaves and branches that extend "outward & downward" away from the trunk. And when it rains, most of the drops are deflected away from the center and base of the tree where it remains pretty much dry.
A "snow flake catcher" is a tree with branches that catches snowflakes and stops them dead in their tracks, or rather fall. And provided there’s no wind or a sudden change of temperature, the base of the tree will remain pretty much clear of snow.
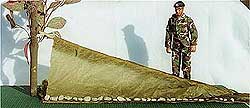
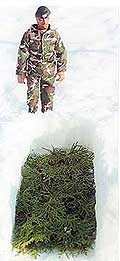
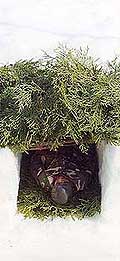
Although these types of trees only provide limited protection, you can add and build a shelter underneath them. And one of the fastest and easiest shelters to build that requires no cordage or cutting of wood is a "debris shelter," sometimes referred to as a "cocoon” or “trash” shelter too.
The first thing you need to do is decide where you want to build your shelter. Which the ideal location is away from dead trees that could crashing down on you during a storm, not in a low valley or river bed where there could be flash flooding and not on or near a hill top to avoid being struck by lightning should a storm come along. But where there’s plenty material for building your shelter, fuel for a fire and if possible near some water too.
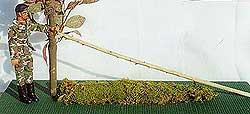
And so once you've selected the spot where you wanna build your shelter, then find yourself a nice long sturdy wooden pole much taller than you and trim off any branches that are sticking out. Then find a tree with a low "V' notch or groove or some big old boulder or rock about 3 feet tall or off the ground and emplace the pole in/on it. Then lay down underneath it to make sure it’s long enough and covers you from head to toe. And if does, then start gathering a whole bunch of leaves, pine needles, grass, etc for your bedding and insulation. And the more you gather, the thicker, dryer, warmer and the more comfortable you'll be inside of it. But watch out, before placing down this beding make sure there’s no ants, insect nests or animal holes nearby. If there is, then you’ll need to find yourself another place to build your shelter. |
 |
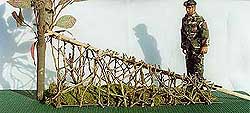 |
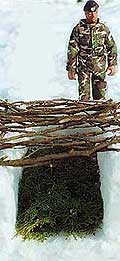
Once you've got your bedding and insulation down on the ground, then you're ready to construct the frame which consist of nothing more than laying a bunch of tree branches in an upside down "V" pattern on both sides of the pole. And the more you put, the sturdier and easier it'll be to complete the next step. |
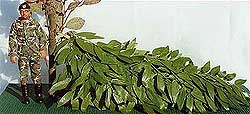
Which is placing lots of tree foliage, tall grass, leaves, pine needles, etc, and I mean lots of it, bunches! Because the more you place on it, the more waterproof it’ll become and the less likely it'll leak if it rains, plus you'll stay warmer and dryer too. And when you place tree foliage and tall grass on the frame, place it in a downward pattern so if it does rain, the rain will follow the downward flow of the leaves and grass. And lastly, then cover the entrance or doorway with some more foliage to keep out not only rain or snow but insects and animals that might find your shelter comfortable too. |
 |
| |
Whenever I teach a survival class in how to build a debri shelter, what I like to do is demonstrate to my students how this downward flow of leaves & grass keeps the rain out of the shelter. And so what I do is take 4-5 pieces of insect screening, fold them in half and then I place them one-over-the-other in an upside "V." Then I place a newspaper or tissue inside and take an ol’ window cleaner bottle, filled it with water and spray it over these screens to simulate "rain." |
And because there are several layers of screens in an upside down "V" the water doesn’t penetrate or reach the newspaper or tissue inside of it. Why? Because the water is being directed away & down along the layers of the wire screening which is exactly how a debri shelter works too when it's covered with leaves, weeds and grass. That is...if you erected it correctly.
Now should you flatten or straighten out these screens and place them one-over-the-other, the water will fall right through all these screen layers. And so should you screw up and build your shelter at the wrong angle and or you don't place enough foilage on top and it rains, it'll leak right through your shelter too. And so that’s why you need to build your debri shelter at the right upside-down "V" angle with lots of foilage on top so you'll stay nice and dry inside of it should it rain.
Now if you're lucky to have a piece of plastic, tarp, nylon parachute or some other waterproof material with you. You can erect the same type of shelter and use this material instead of weeds, leaves & grass, or you can us a combination of both for extra protection and insulation. |
 |
Now if you happen to be stranded in a snow white winter wonderland environment, the best type of shelter that will provide you warmth and protection is either a "snow cave" or a "snow trench." Though they're much easier to build with a shovel, they're not impossible to make with your hands. But deciding which one to build depends entirely on how much snow there is on the ground.
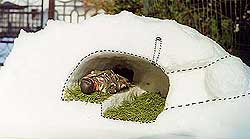 |
To build a "snow cave" you need to find a nice deep snowdrift which are usually found on the opposite side from whichever way the wind is blowing along a steep embankment or ridge. To check the depth to make sure it's deep enough, place a long stick into the snow. And if it is deep enough, then begin digging or burrowing a tunnel at the base of the snow drift or embankment for about yard/meter or so and then start making it bigger sideways.
Don't make it too big, it only has to be wide enough to sit & lie down in, not to stand up in. And once you've made it a comfortable body size, then begin arching and rounding out the ceiling to give it maximum weight support and to prevent any melting snow from dripping down on top of you but instead along the sides. Then all you gotta do is gather some foilage, pine needles, leaves or whatever is available for insulation & bedding. Then partially close the entrance with some snow and very carefully make a fist size "air hole" in the ceiling so you don't die from carbon dioxide. |
What's carbon dioxide and how can it kill you? It's when all the oxygen inside a snow cave is sucked up due to poor air ventilation and you keep breathing in over and over again what your body releases, "carbon dioxide." And yep, it'll kill ya, especially in your sleep. And so that's why you need an "air hole," so be careful and don't forget to make one and keep it always clear if it starts to snow.
Now if there ain't enough snow to make a snow cave, then you'll have to make a "snow trench" instead.
 |
|
 |
|
 |
First, dig/clear away the snow all the way to the ground, then fill it full of leaves, pine needles or whatever you can find. And I mean pack & fill it good.
|
|
Second, place a bunch of wooden poles across the hole, then another layer criss crossed on top of this, and then a bunch of sticks in all directions to fill up the space.
|
|
Third, then place pine needles, leaves, and whatever else you can find on top. Again, fill it, pack it and pile as much stuff as you can find on top of it.
|
And then all you gotta do is pick a place where you want to get into it and once you’re inside cover back up the entrance. If you got a candle, don't be afraid to use it inside, not only will it provide a source of light but warmth too.
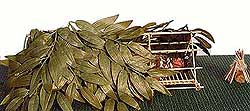
Now if you're somewhere in a tropical jungle you won't have any problems finding material to build a shelter, it'll be like living inside a "Home Depot" store. Everything from vines that you can use as cordage, large plant & tree leaves for roofing & bedding to bamboo sticks that can be used for your shelter's framework, EVERYTHING! All you need is a little imagination and ingenuity. Check out this jungle shelter!
 |
This type of shelter is normally built in damp and swampy places between two trees above the ground to keep dry and to keep those crawling little critters off you too. Notice how the leaves on the roof are placed with the stem ups, over-lapping and tied to the framework "roof shingle style." |
Here’s another type of jungle shelter except this one you can either have it on the ground or a few inches off the ground. And then you cover it with what ever you can find and use for your roofing & bedding. Though not pictured, for comfort and bedding you should place several layers of foilage on the ground and or on the bed frame. Remember, when possible always try to build your jungle shelter off the ground to keep dryer and to keep the crawling little critters off you so you can try to get a decent night's sleep. |
 |
Now let's briefly talk about how to make some type of shelter out in the middle of a hot scorching desert where there's absolutely nothing, and I mean nothing but sand and or rocks
Though this is not the best nor the ideal shade you would want to have in a desert, but at least it's better than nothing at all. Provided you've got something you can use as an overhead cover such as a poncho, blanket, parachute, etc. Then either find a low spot in the ground or dig out an area, drape it over and then place some rocks or piles of sand along the edges so it rests above you and not on you.
Yep, in a desert it’s not easy to find shade, that’s why it’s best to try to always be prepared. To learn more desert survival tips & tricks, click on my "Hot Desert Tips" page.
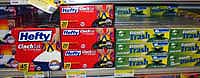 |
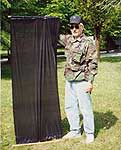
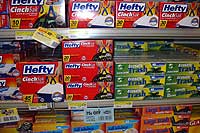
Now let’s talk about another type of shelter, some low-cost, inexpensive, compact and lightweight ones called Trash Bag Shelters. Yep, you heard me right, I said trash bag shelters! Though there are many types of trash bags on the market, the larger and sturdier the better like good ol’Hefty’s 30 gal. and 39 gal. trash bags. Yea, these will work just fine. |
But there are a few other types, someone once sent me some large “orange color” trash bags for leaves and boy were they large, sturdy and made terrific trash bag shelters. And when I asked the sender where he got’em, he told me they're the same trash bags highway cleaning crews use and so you can only find them in certain stores And because I’m retired and live here in Italy, if you’re interested in acquiring them you’ll have to shop & look around back in the US of A for them.
 |
Now here's how you make a one person trash bag shelter…
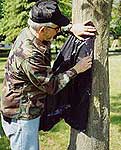
First you find yourself a tree, place your trash up against it and with a knife cut it only along the left & right sides and NOT at the bottom of the bag. Then once you've done this you can then open it up the trash bag all the way and remove the draw string at the top of the bag.
BE CAREFUL...if you try to cut the edges of the trash bag without using a tree you'll "stretch & tear" the plastic and it'll look like piece of crap when it's set up. If you don't want to use a knife you can use a pair of scissors instead.
|
Next, open up the trash bag all the way and then find yourself 2 x narrow, smooth, wooden sticks a little bit longer than the width of the trash bag and run them through both ends where the drawstring use to be. Or another way is to run some string through where draw strings use to be and then attach the ends [of the string] to two stick wider than the trash bag..
|
 |
 |
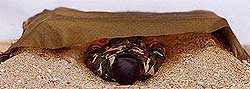
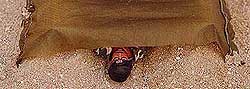
Now there's two ways you can set up this trash bag shelter, you can either use two trees that are fairly close together so you can tie it between them. Or you can attach one end to a tree and attach the other end to a couple of stakes on the ground. Each one has their advantage and disadvantage depending on the climate and weather condition. |
For example: If it's raining and you want to stay dry, attach one end to the ground and the other end to a tree. So if it begins to rain really hard, the plastic will "stretch & rest" on top of you instead of "stretching & tearing apart" above you. Makes sense, don't ya think?
Now if you're in a hot environment you'll wanna try to attach it between two trees well above your body so you'll stay cooler in the shade and feel less heat reflecting off the plastic. And don't worry if it starts to stretch and sage, heat does that to thin plastic and so there's nothing you can really do about it but to try to get some use out of it before it melts and disintegrates away.
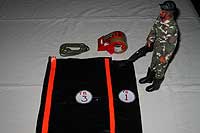
Here's another type, it can be used either as a one or two person trash bag shelter. Though this one is a bit more complicated to make, you’ll need several trash bags and some good sticking packaging tape. I would advoid using duck tape simply because it will add weight and thickness to the trash bags and it will be difficult to fold & pack up. But it’s entirely up to you what kind of tape you want to use, and so here’s how you make'em..
 |
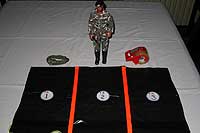 |
Choose the largest & durable.. |
cut'em & lay'em side-by-side.. |
 |
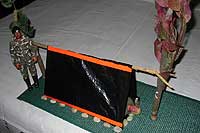 |
tape'em together the long way.. |
and then try it out by putting it up. |
.  
Wilderness Survival Skills > Wilderness Survival Tips > Here
Back to top of page
E-MAIL THIS SITE TO A FRIEND |